Friday, 11 January 2013

Eggslighting


Researching the internet for ideas about light, I came across a video on You Tube by an American portrait photographer, Joe Edelman.  The video was called Remember the Egg, as a student he was given an assignment to photograph an egg in five different ways, although his demonstration is by way of a video, the principle is just the same for still photography.  He recommends trying the experiment for yourself, this being the best way to learn.  Taking his advice, I set-up my egg on some white card and instead of using a tungsten lamp, I decided on flash, the gun is a lot smaller to move around and the light is more controllable.  I took twelve images, starting at the front and moved the flash clockwise around the egg, the results are shown below along with a picture of my homemade honeycomb attachment for my flashgun.


Tuesday, 8 January 2013

Exercise 13: Shiny surfaces.

"Objects with surfaces that reflect brightly, such as anything chrome or silver, are a special lighting problem.  There are ways of dealing with them that make such a remarkable difference to a photograph.  Find an object that is so shiny that you can see your face in it, make sure it is not too large.  Place it in front of a simple background, if using black, then black velvet is better than card or paper.  Set up the object, camera and a light positioned close to the camera, through the viewfinder, you should be able to see how unsatisfactory the effect is, take a photograph for reference."

The coursebook recommends making a light tent out of tracing paper, in the shape of a cone.  Unfortunately I was unable to get hold of large sheets of tracing paper, however a friend had a light cube which I was able to use, included is a photograph of the set-up used.

"Take photographs with the light outside of the 'tent' in different positions and at different distances, also try changing the angle of the object slightly.  Depending on the choice of objects, some difficulty may be had in losing the reflection of the camera lens."

Because the light cube had a slit in the front for the camera lens to go through, moving it to a position where a reflection of the lens in the object being photographed was not possible.


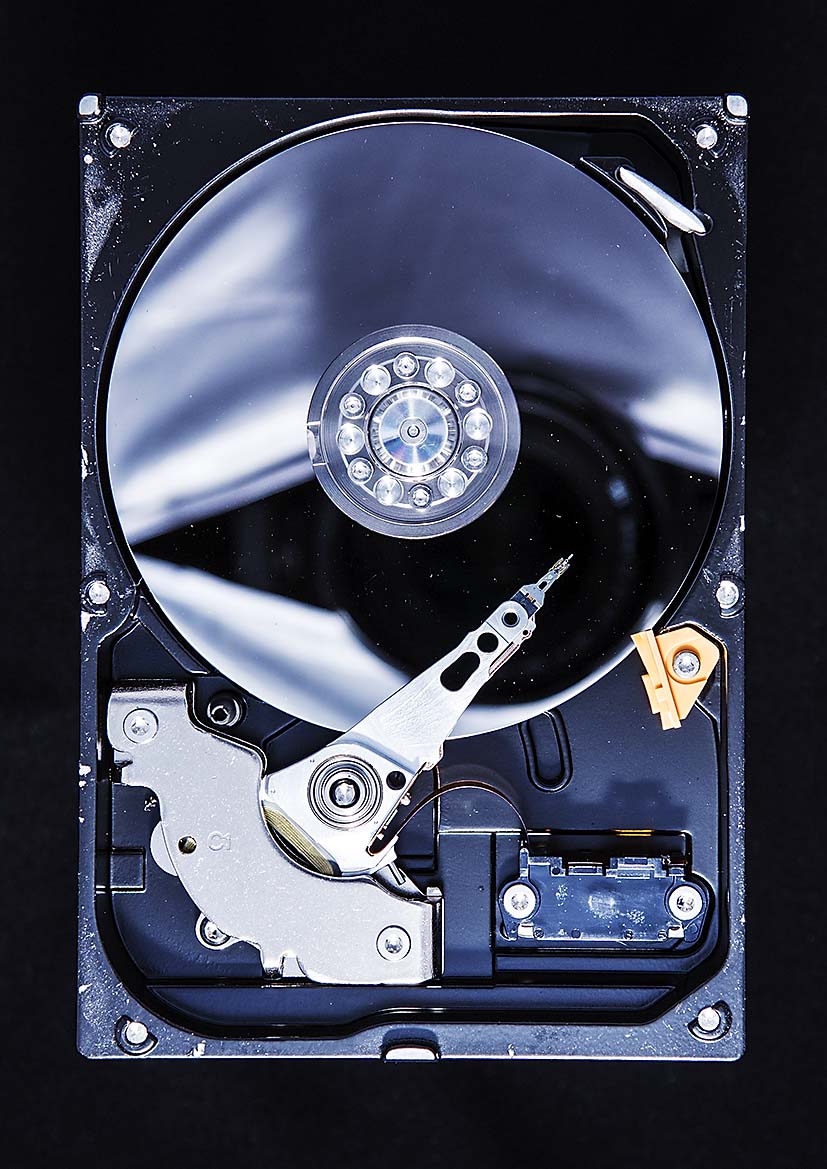
I tried three different objects for this exercise, the inside of a defunct computer hard drive, a chrome sweet dish and a copper rose bowl. A brief description of the lighting angle is with each image.

Flashgun inside tent alongside the camera.

Light through the side of the tent.

Light through the front of tent, under exposed.

The disc of the hard-drive was very reflective almost like a mirror and of course flat, this made it impossible to hide the reflection of the camera lens and of course the light when it was next to the camera.  Even when the light was held at the same level as the disc, some reflection can still be seen although the shiny disc is now very dark because no light is now shining down on it.

Sweet dish with light to side of camera.

Light through the side.

Light from the top and front.

Again problems with reflections in the chrome dish, lighting from above shows the red sweets up well, this helps draw the eye away from the problems with the dish.

Copper rose bowl, flash to side of camera.

Light through top left of tent.

Light top centre of tent, slight reduction in output of flashgun.

Now that the exercise is finished, I'm wondering if using a cone of tracing paper might have worked better.  The light tent was easy to work with, being light, made of neutral material with plenty of room to arrange the subject to be photographed.  The last image, the one I consider to be the best, illustrates my point.  I have managed to minimize the reflection of the camera and lens, however you can clearly see the shape of the light tent and black fabric the bowl was standing on, a cone of tracing paper would not have been so noticeable.

Exercise 12 Concentrating light.

"Sometimes, you may want the light to fall on just a part of the scene, having the surrounds in shadow.  If using a flash unit, roll up some thick black paper into a tube, the same diameter as the flash head and about two feet long, use tape to keep it this shape, the result will be a kind of spotlight."

I made a tube out of black card to fit my flashgun as the coursebook suggested, using a tungsten light might have caused problems with over heating.  Also flash, gave me control of the light output, I had previously experimented using the flash and camera in manual mode.  The camera was mounted on a tripod, this  allowed me to use a shutter speed of 1/45sec, also I was able to hold the flash to one side on an extension lead.  Because I wanted to balance the tungsten lights in the room with the output from the flash, I reduced the output to 1/32.  The resulting images along with a photograph of the equipment used are shown below.


Friday, 30 November 2012

Exercise 11: Contrast and shadow fill.


"Set up a simple still-life shot, fix the light at right angles to the camera, about two to three feet from the subject and at the same level.  With the camera on a tripod, take the first photograph without a diffuser in front of the lamp and the second with the diffuser.  Follow these with a series of five exposures, the light and camera must remain unchanged.  Take a white card and place it three feet from the still-life on the opposite side to the light and facing it, take a photograph, move the card closer to the subject, approx halfway, take another photograph.  Repeat this procedure with the following, a sheet of aluminium foil, dull side towards the light, next the foil shiny side towards the light, finally crumple the foil, then smooth it out again and with the shiny side out take two more photographs.  Compare the results and arrange them in order of contrast, from the one with the biggest difference between the lit and shaded parts, to the least."


My first subject was the ornament above, it has good texture and lots of detail but I felt it was too thin, because of this the difference between the light and shadow areas would be difficult to see.  The plate of partially eaten fruit was my preferred choice for the exercise it has lots of shape, form, texture and colour, the requirements for the assignment to follow.  I used the same set-up of a flash gun with my home made diffuser for lighting.


Following the guidance in the coursebook, I have arrange the images in order, starting with the picture with the greatest contrast and finishing with the least.  I'm not sure if its the fault of my arrangement or the lighting set-up, but apart from a couple of the images most seem to be evenly lit.  The top of the apple, which was nearest the reflector shows the most variation in reflected light.  This has been a very satisfying exercise to do, I will from now on make use of a diffuser, in most lighting situations.

There are several photographs of high contrast images in the coursebook, two are portraits of Alfred Stieglitz and Edward Weston taken by different photographers.  They are both quite dark, only a part of there faces can be seen clearly, this adds drama and an element of mystery.  In the picture taken by Dorothy Norman of Stieglitz his eyes are staring out from the image, his look is menacing.  The photograph of Weston has been taken from a low angle, with the light coming from above and behind, his eyes are therefore in shadow, and cannot be easily be seen.  I find myself looking hard at that dark area trying to see his eyes, I assume this was what the photographer intended.

Exercise 10: The lighting angle.

"With the use of a diffused single light, experiment using it from different directions.  Find a subject that is no larger than the diffuser on the front of the lamp, the important thing is that it should have a variety of planes to show the differences in shadows and light.  With the camera in a fixed position, on a tripod, aimed horizontally at the subject, there needs to be room to move around the object with a light.  Take photographs as the light is moved around keeping it at the same level as the subject.  Beginning with the front, then sides, rear to the side and finally with the light directly behind making a silhouette of the subject.  Then raise the light  so that it points down at about 45 degrees, move it round again, taking photographs in similar positions again.  Finally, with the light overhead, pointing down, take three pictures, directly overhead, from slightly in front and from behind.  Look at the photographs, study the differences in order to become familiar with the effect of moving the light.  Certain qualities of the subject are revealed better by some lighting directions, which position gives the best three dimensional affect and of all them, which do you prefer, and why?"

I chose an old twin lens Yashica film camera as the subject for this exercise, flash was used for the light source, eliminating the white balance problem I had in the previous exercise.  For clarity I have included a photograph of the home made diffuser that was used.


All the photographs taken are below, I've identified the angle of lighting on each one.


If I had to choose a favourite photograph from the above set, it would be "light above front left".  Had this been product photography, then this angle of lighting shows off the camera to best advantage.  The texture on the side shows up well along with the majority of the camera's controls, I feel it looks imposing and important.  This impression might have been strengthened had the camera angle been lower so removing the table and stand it was on.

Exercise 9: Softening the light.

"Set up a still-life arrangement, with any object or group of objects.  The lighting direction will depend on the subject, if in doubt, fix the naked lamp more or less overhead, pointing down.  Take two photographs, one with just the naked lamp, the other with a piece of translucent material held between the lamp and the subject.  The two exposure settings will be different, look at the results and note what differences can be seen, for instance, at the strengths (blackness) of the shadows, their extent and hardness of their edges.  Look also at the highlights and at the contrast, finally, was the diffusion an improvement?

The ornament was chosen for it's shape, when I shone a light down onto it the shape of the shadow looked interesting, white card was used, it would make the shadows easier to see.  The light used was an angle poise lamp fitted with a Tungsten bulb and white tissue paper for the diffuser.

Naked light.

Diffused light.


I tried to correct the white balance in the raw converter of Photoshop, which was successful with the naked light image, however the photograph taken with a diffused light has a slight colour cast.  The shadow in the first image is, as expected, darker and clearly defined with quite sharp edges also the naked light picture has more contrast.  The diffused photograph has an overall softness about it, not just the shadow, if I could remove the colour cast, this would be my preferred image.

Wednesday, 21 November 2012

Exercise 8: Outdoors at night.

After the Sunset.

The aim of this exercise is to explore the variety of lighting effects and colour in artificial light, try to include the following subjects:-

  • A floodlit building.
  • A brightly-lit store front.
  • A large interior with many people, such as a shopping centre.
  • Light streaks, such as traffic on a busy road.
I have tried to take a wide variety of lighting types, having learned quite a lot while doing the exercise on Tungsten and Fluorescent lighting.  The majority of images were taken with the camera set to Daylight white balance, any that were photographed using a different setting have been so marked.  The first three were taken through the car windscreen and were originally intended for a previous exercise, cloudy weather and rain.  I had been taking the lights and raindrops as we drove down the A50,  at Mere on the outskirts of Stoke, the road goes through a tunnel.  The three images, before the tunnel, one while going through it, and the last after exiting, were taken within seconds of each other, all were taken in different lighting.


The next photographs were taken in Nantwich, I looked around the town centre, but could only find buildings that were lit by Sodium lights, I've included two as an example of this kind of lighting.


Next I tried my local railway station, Crewe, from past experience I knew there was a variety of lighting on the platforms.  The first two photographs were taken on different white balances as shown, the one using Auto is closest to the light I remember when the picture was taken.


Next, two photographs taken with the ISO increased to enable me to hand hold the camera, also attempting to stop subject movement.  This part of the station has a type of sodium lighting, similar to the lighting in the pictures above, I selected Auto white balance in the raw converter of Photoshop, the result seems better than the camera's Auto setting, unless the lights were of a different type.

    ISO 12800 1/45sec f8

    ISO 25600 1/60sec f8


For the remainder of this exercise I used the Daylight white balance setting on the camera, the first picture shows the interior of a train, the light appears almost white.  The remaining photographs were taken at other parts of the station where the lighting was a lot brighter, the images taken there appear more natural.  The course book says that Mercury vapour lamps give off a blueish white light, I assume that some parts of the station are lit with them.


Having tried my local area I went to Liverpool to look for more examples of lighting, I was not disappointed.  I made for the area around the Pierhead where I knew there was a variety of old and new buildings.  The older buildings are floodlit so made excellent subjects for photography, combined with the brightly lit interiors of the newer buildings.  I also found L.E.D lights set into the handrails of steps and fluorescent lights built into the concrete backs of seating along the river side path. The following photographs are just a sample of the ones taken.


The next two photographs are an example of how fluorescent lighting can alter the white balance in a scene. Both images were taken without changing position, I simply turned the camera round 90 degrees, the first picture includes the Fluorescent lights whereas the second does not.


My final photograph was taken after the twilight had gone from the sky, it is proof of how much better pictures taken with some light in the sky are. The tops of the buildings have almost been lost because the contrast has been increased so much after it went completely dark.


I've learned how important it is, to be aware of the different kinds of lighting and to know how it can change an image, the advantage of photographing in raw is something I have known about for some time, doing this exercise has reinforced this.  However I did not fully realise the effect that Fluorescent lighting has on a scene and the changes it makes when mixed with other types of lighting.  Finally I have learned how important it is to have some light left in the sky when photographing the exteriors of buildings, for example, in particular the contrast can be kept in check by that small amount of twilight.